IKEv2 직접 설정 방법입니다. 위 탭에서 다른 VPN 방식을 선택할 수 있습니다.
오래된 버전의 MAC의 경우 예전 접속 방법을 확인하세요. 예전 접속 방법 보러 가기
접속 설정 만들기
MAC OS X에는 IKEv2 접속 기능이 자체 내장되어있어 별도의 앱을 설치하지 않고도 간단한 설정만으로 VPN 접속이 가능합니다.
1 "시스템 설정"에서 "네트워크" 를 클릭하세요. 오른쪽 아래에 있는 동작 팝업 메뉴 를 클릭하고 VPN 구성 추가를 선택한 다음, IKEv2를 선택하세요.
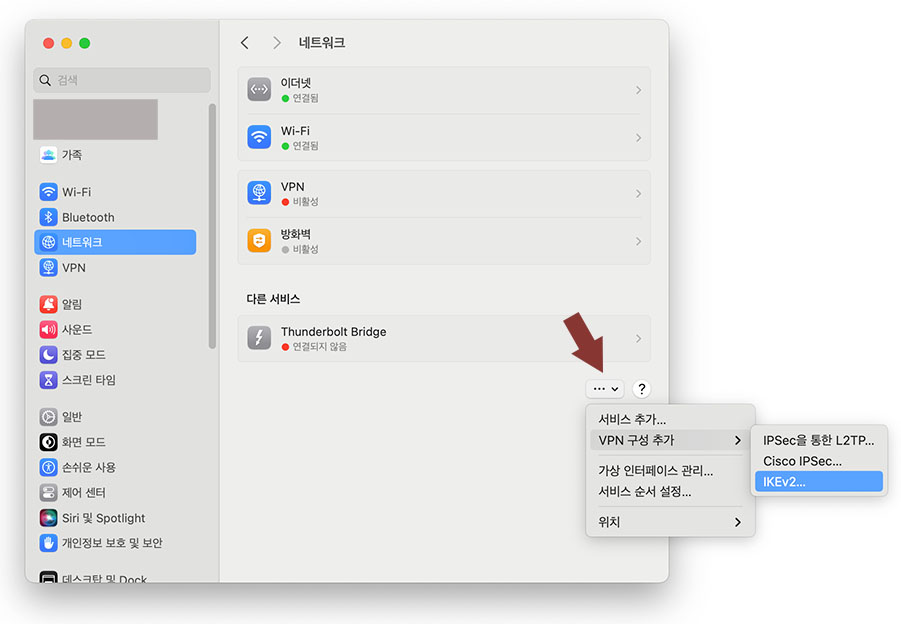
2 설정 창이 열리면 아래와 같이 입력합니다.
| 표시 이름 | "IPany" 입력 |
| 서버 주소 | 아래 주소 중 하나를 선택해 입력 (해외 사용자의 경우, 접속이 잘되지 않거나 인터넷 속도가 느리다면 다른 서버를 선택해 접속해 자신에게 맞는 서버를 찾아 사용합니다.)
|
| 원격 ID | 위 서버와 동일하게 입력합니다. |
| 로컬 ID | 비워둡니다. |
| 사용자 인증 | "사용자 이름"을 선택 |
| 사용자 이름 | IPany 홈페이지의 계정 관리에서 생성한 계정의 아이디를 입력합니다. |
| 암호 | IPany 홈페이지의 계정 관리에서 생성한 계정의 비밀번호를 입력합니다. |
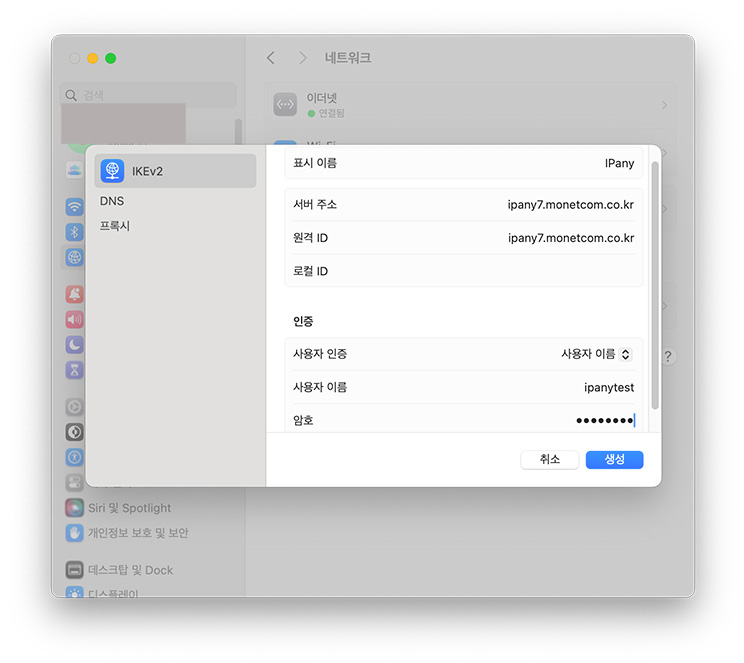
생성을 클릭하여 저장합니다.
3 오른쪽 버튼을 클릭하면 VPN에 접속됩니다. 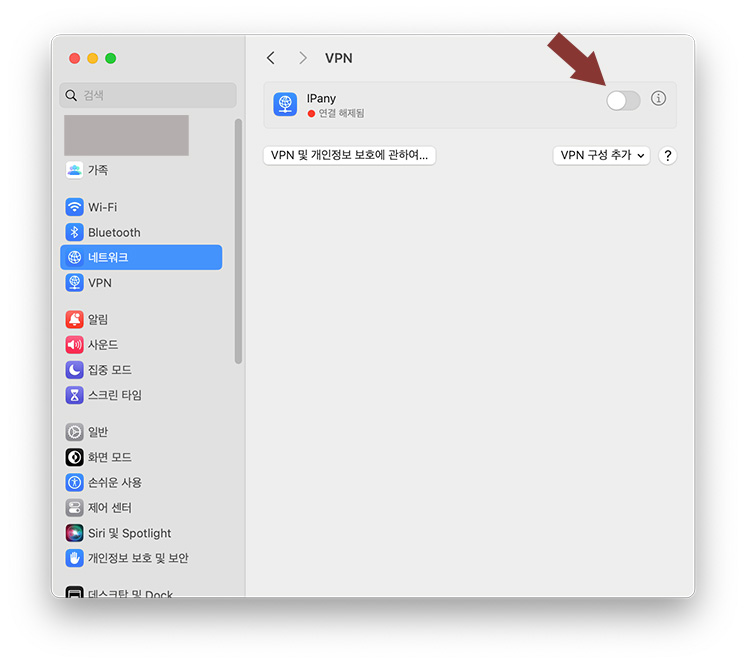
간편 접속 및 접속 끊기
그림과 같이 메뉴 막대의 VPN 상태 아이콘을 클릭하고 "IPanyXX 연결"을 선택하면 접속됩니다. 
VPN 상태 아이콘을 클릭했을 때 "IPany 연결"이 "IPanyXX 연결 해제"로 변경되어 있으면 접속에 성공한 것입니다. "IPanyXX 연결 해제"를 클릭하면 접속이 끊어지게됩니다. 
접속에 실패했다면 아래 "접속 실패 원인 확인"을 참고하세요.
MAC OS X에서 DNS 서버를 한국 DNS 서버로 변경하는 방법입니다.
이 방법으로도 해결이되지 않는다면 PI보드를 이용한 VPN 접속 방법을 사용해야 합니다.
- 시스템 설정의 네트워크에서 인터넷에 연결된 이더넷 또는 Wi-Fi의 "세부사항"을 클릭합니다.
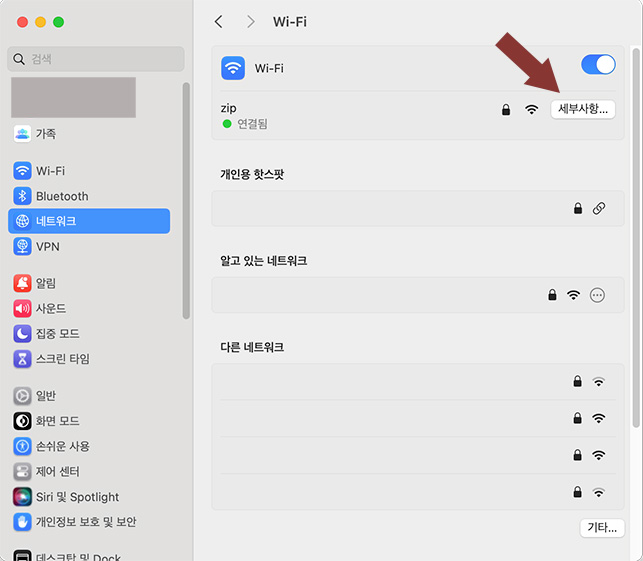
- 왼쪽에서 DNS를 선택하고 오른쪽 "DNS 서버"에서 기존 입력된 DNS 서버를 수정하거나 +(플러스)를 클릭하여 그림과 같이 한국 DNS 서버 주소를 입력합니다.
한국 DNS 서버:
168.126.63.1
168.126.63.2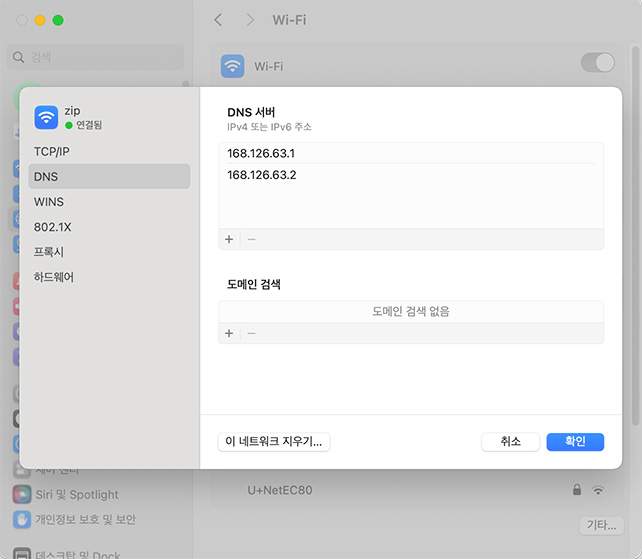
접속 서버 변경 방법
접속이 잘되지 않거나 인터넷 속도가 느리다면 아래 방법으로 다른 서버를 선택해 접속해보세요.
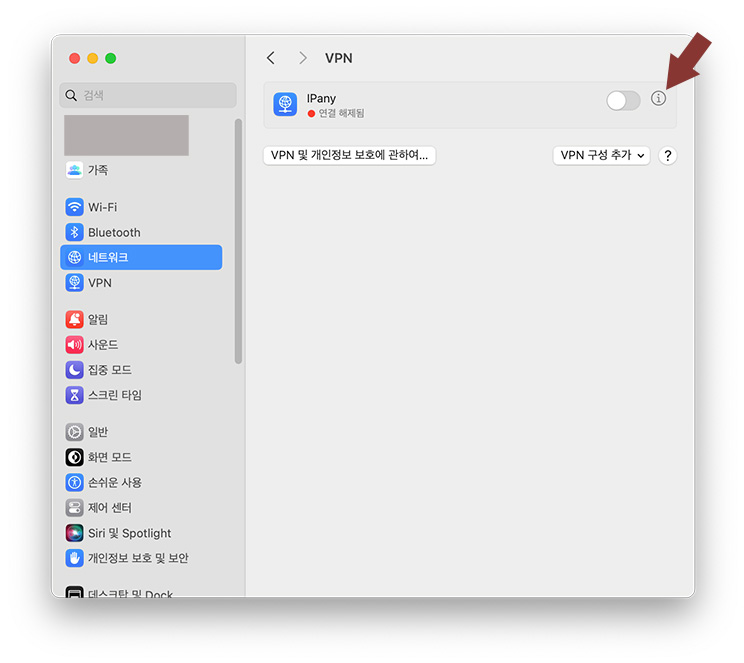
"시스템 설정"에서 네트워크 > VPN로 이동합니다.
오른쪽에서 VPN 설정 옆의 정보 버튼 을 클릭합니다.
서버 주소와 원격 ID를 동일하게 변경합니다. 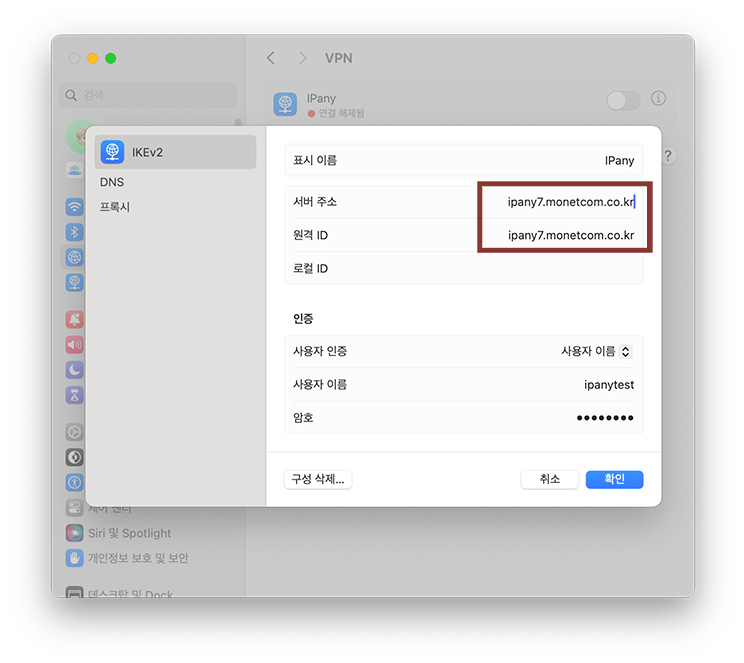
IKEv2 접속이 가능한 서버는 아래와 같습니다.
- ipany1.monetcom.co.kr
- ipany2.monetcom.co.kr
- ipany3.monetcom.co.kr
- ipany4.monetcom.co.kr
- ipany5.monetcom.co.kr
- ipany6.monetcom.co.kr
- ipany7.monetcom.co.kr
- ipany8.monetcom.co.kr
- ipany9.monetcom.co.kr
- ipany10.monetcom.co.kr
- ipany11.monetcom.co.kr
- ipany12.monetcom.co.kr
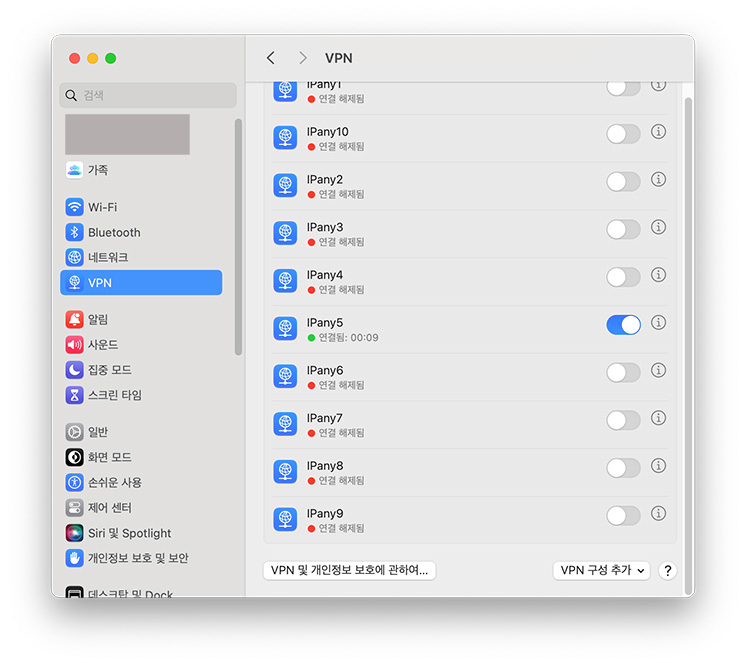
매번 서버 변경이 번거롭다면, 미리 여러 서버를 등록해놓고 그때그때 다른 서버를 선택해 접속하면 편리하게 사용할 수 있습니다.
접속 설정 삭제
"시스템 설정"에서 네트워크 > VPN로 이동합니다.
오른쪽에서 VPN 설정 옆의 정보 버튼 을 클릭합니다.
구성 삭제를 클릭하여 VPN 접속 설정을 삭제할 수 있습니다. 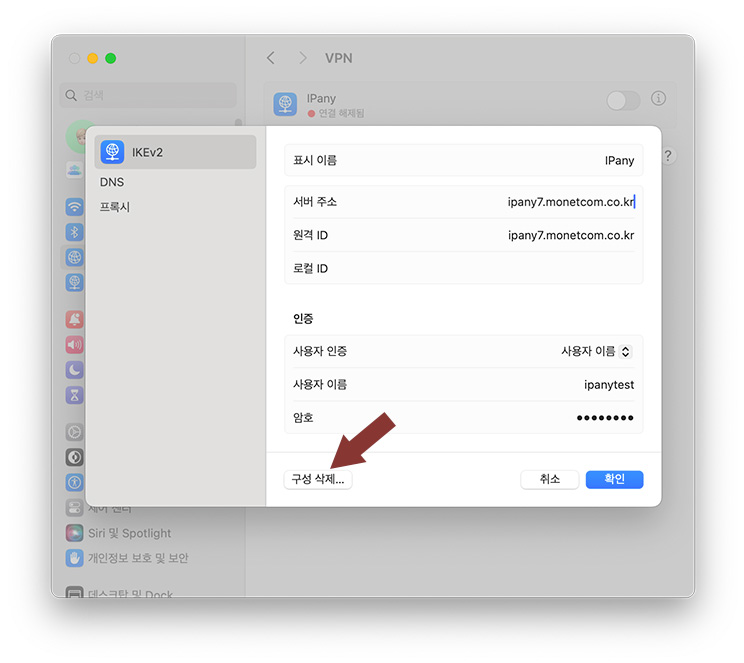
접속 실패 원인 확인
해외에서 접속하는 사용자의 경우 접속 서버를 변경하여 접속 장애를 해결하거나 품질을 향상시킬 수 있습니다. 위 "접속 서버 변경" 내용을 확인하세요.
서버를 변경해도 접속이 되지 않는다면 아래 내용을 확인하세요.
| 접속 실패 원인 | 해결 방법 |
|---|---|
| Username 이나 Password를 잘못 입력한 경우 | 아이디와 비밀번호를 잘못 입력하지 않았는지 확인합니다. (IPany 홈페이지의 계정 관리에서 자신이 생성한 VPN 접속 계정의 아이디와 비밀번호를 확인할 수 있습니다.) |
| 만기일이 지난 경우 | IPany 홈페이지의 계정 관리에서 VPN 접속 계정의 사용 기일이 지나지 않았는지 확인합니다. 사용 기한이 지났다면 "연장" 버튼을 클릭하여 결제하고 연장합니다. |
| 이중으로 접속된 경우 | IPany 서비스는 같은 계정으로 동시에 이중 접속이 되지 않습니다. 이미 다른 기기에서 접속되어 있지 않은지 확인하고 접속되어 있는 기기에서 VPN 연결을 끊어줍니다. IPany 홈페이지의 계정 관리의 "현재 VPN 연결 현황 확인하기" 버튼을 클릭하면 VPN 서버에 연결되어 있는 현황를 확인할 수 있으며, 강제 접속 종료도 가능합니다. |
| DNS 서버 문제 | DNS 문제로 IPany VPN 서버를 찾지 못하면 VPN 연결이 가능하지 않습니다. 네트워크 설정에서 AirPort나 이더넷의 DNS 설정에서 DNS 서버 주소를 168.126.63.1로 변경해 주세요. |
L2TP/IPsec VPN 접속 방법입니다. 오래된 L2TP 방식을 보완하기위해 IPsec으로 이중 터널을 구성하는 방식입니다. IPsec 터널을 구성하기 때문에 중국에서도 차단되지 않습니다. 문제가 많은 PPTP 방식을 대체할 수 있으며, IKEv2 방식 접속에 문제가 있는 경우 이 방식을 이용할 수 있습니다.
오래된 버전의 MAC의 경우 예전 접속 방법을 확인하세요. 예전 접속 방법 보러 가기
접속 설정 만들기
MAC OS X에서는 L2TP/IPsec 접속 기능이 자체 내장되어있어 별도의 앱을 설치하지 않고도 간단한 설정만으로 VPN 접속이 가능합니다.
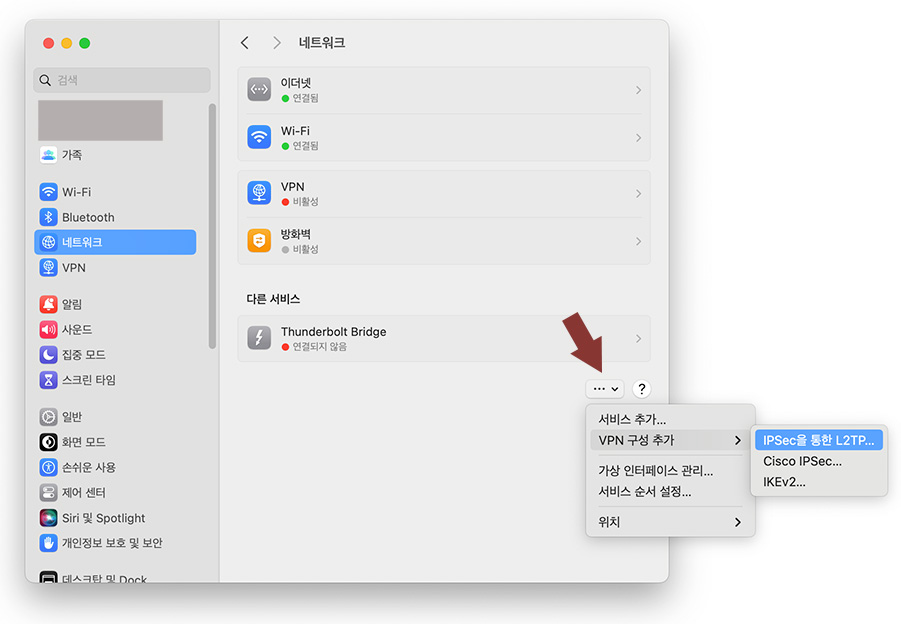
1 "시스템 설정"에서 "네트워크" 를 클릭하세요. 오른쪽 아래에 있는 동작 팝업 메뉴 를 클릭하고 VPN 구성 추가를 선택한 다음, IPSec을 통한 L2TP를 선택하세요.
2 설정 창이 열리면 아래와 같이 입력합니다.
| 표시 이름 | "IPany" 입력 |
| 구성 | "기본" 선택 |
| 서버 주소 | 아래 주소 중 하나를 선택해 입력 (해외 사용자의 경우, 접속이 잘되지 않거나 인터넷 속도가 느리다면 다른 서버를 선택해 접속해 자신에게 맞는 서버를 찾아 사용합니다.)
|
| 계정 이름 | IPany 홈페이지의 계정 관리에서 생성한 계정의 아이디를 입력합니다. |
| 사용자 인증 | "암호" 선택 |
| 암호 | IPany 홈페이지의 계정 관리에서 생성한 계정의 비밀번호를 입력합니다. |
| 시스템 인증 | "공유 암호" 선택 |
| 공유 암호 | "redsun"을 입력합니다. |
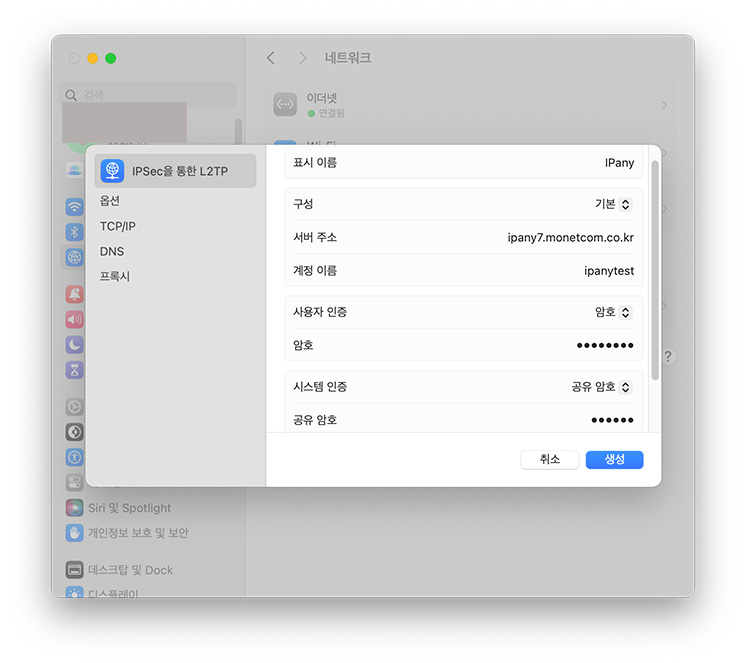
생성을 클릭하여 저장합니다.
3 오른쪽 버튼을 클릭하면 VPN에 접속됩니다. 
간편 접속 및 접속 끊기
그림과 같이 메뉴 막대의 VPN 상태 아이콘을 클릭하고 "IPanyXX 연결"을 선택하면 접속됩니다. 
VPN 상태 아이콘을 클릭했을 때 "IPany 연결"이 "IPanyXX 연결 해제"로 변경되어 있으면 접속에 성공한 것입니다. "IPanyXX 연결 해제"를 클릭하면 접속이 끊어지게됩니다. 
접속에 실패했다면 아래 "접속 실패 원인 확인"을 참고하세요.
MAC OS X에서 DNS 서버를 한국 DNS 서버로 변경하는 방법입니다.
이 방법으로도 해결이되지 않는다면 PI보드를 이용한 VPN 접속 방법을 사용해야 합니다.
- 시스템 설정의 네트워크에서 인터넷에 연결된 이더넷 또는 Wi-Fi의 "세부사항"을 클릭합니다.

- 왼쪽에서 DNS를 선택하고 오른쪽 "DNS 서버"에서 기존 입력된 DNS 서버를 수정하거나 +(플러스)를 클릭하여 그림과 같이 한국 DNS 서버 주소를 입력합니다.
한국 DNS 서버:
168.126.63.1
168.126.63.2
접속 서버 변경 방법
접속이 잘되지 않거나 인터넷 속도가 느리다면 아래 방법으로 다른 서버를 선택해 접속해보세요.
"시스템 설정"에서 네트워크 > VPN로 이동합니다.
오른쪽에서 VPN 설정 옆의 정보 버튼 을 클릭합니다.
서버 주소를 변경합니다. 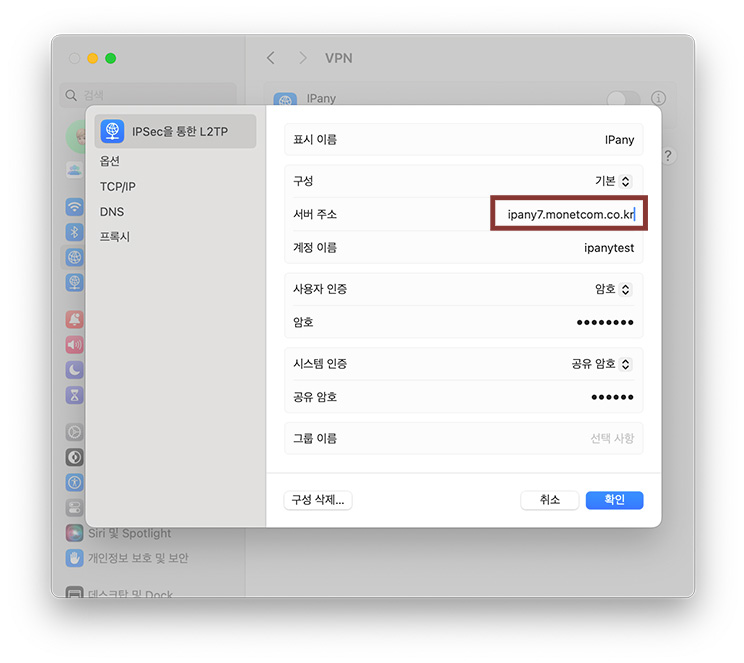
L2TP/IPsec 접속이 가능한 서버는 아래와 같습니다.
- ipany1.monetcom.co.kr
- ipany2.monetcom.co.kr
- ipany3.monetcom.co.kr
- ipany4.monetcom.co.kr
- ipany5.monetcom.co.kr
- ipany6.monetcom.co.kr
- ipany7.monetcom.co.kr
- ipany8.monetcom.co.kr
- ipany9.monetcom.co.kr
- ipany10.monetcom.co.kr
- ipany11.monetcom.co.kr
- ipany12.monetcom.co.kr
매번 서버 변경이 번거롭다면, 미리 여러 서버를 등록해놓고 그때그때 다른 서버를 선택해 접속하면 편리하게 사용할 수 있습니다.

접속 설정 삭제
"시스템 설정"에서 네트워크 > VPN로 이동합니다.
오른쪽에서 VPN 설정 옆의 정보 버튼 을 클릭합니다.
구성 삭제를 클릭하여 VPN 접속 설정을 삭제할 수 있습니다. 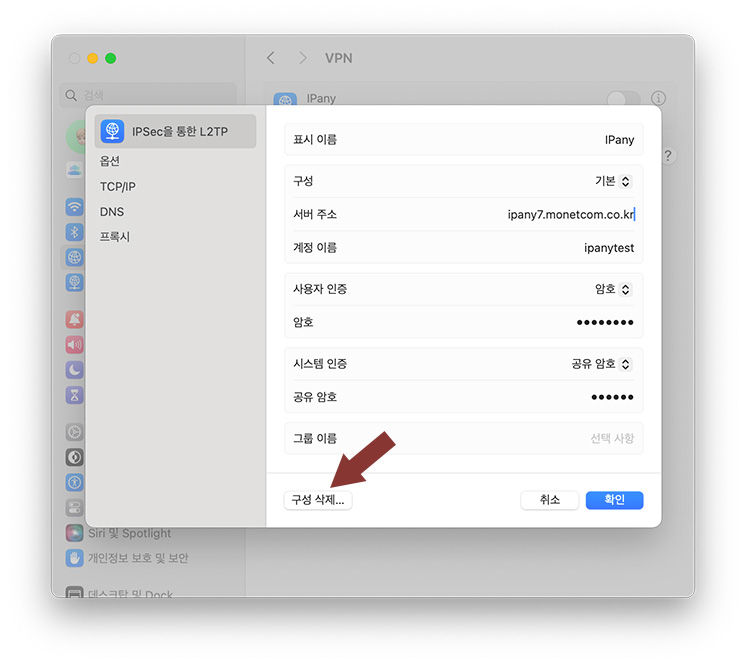
접속 실패 원인 확인
해외에서 접속하는 사용자의 경우 접속 서버를 변경하여 접속 장애를 해결하거나 품질을 향상시킬 수 있습니다. 위 "접속 서버 변경" 내용을 확인하세요.
서버를 변경해도 접속이 되지 않는다면 아래 내용을 확인하세요.
| 접속 실패 원인 | 해결 방법 |
|---|---|
| Username 이나 Password를 잘못 입력한 경우 | 아이디와 비밀번호를 잘못 입력하지 않았는지 확인합니다. (IPany 홈페이지의 계정 관리에서 자신이 생성한 VPN 접속 계정의 아이디와 비밀번호를 확인할 수 있습니다.) |
| 만기일이 지난 경우 | IPany 홈페이지의 계정 관리에서 VPN 접속 계정의 사용 기일이 지나지 않았는지 확인합니다. 사용 기한이 지났다면 "연장" 버튼을 클릭하여 결제하고 연장합니다. |
| 이중으로 접속된 경우 | IPany 서비스는 같은 계정으로 동시에 이중 접속이 되지 않습니다. 이미 다른 기기에서 접속되어 있지 않은지 확인하고 접속되어 있는 기기에서 VPN 연결을 끊어줍니다. IPany 홈페이지의 계정 관리의 "현재 VPN 연결 현황 확인하기" 버튼을 클릭하면 VPN 서버에 연결되어 있는 현황를 확인할 수 있으며, 강제 접속 종료도 가능합니다. |
| DNS 서버 문제 | DNS 문제로 IPany VPN 서버를 찾지 못하면 VPN 연결이 가능하지 않습니다. 네트워크 설정에서 AirPort나 이더넷의 DNS 설정에서 DNS 서버 주소를 168.126.63.1로 변경해 주세요. |
프로파일 등록으로 IKEv2 VPN 접속을 설정하는 방법입니다. 위 탭에서 다른 VPN 방식을 선택할 수 있습니다.
접속 설정 만들기
MAC OS X에는 Sierra 버전 부터 IKEv2 VPN 접속 기능이 내장되어 있어 별도 프로그램 설치없이 VPN 접속이 가능합니다.
1 IPany은 모두 12개의 접속 서버를 제공합니다. 여러 서버를 등록하여 상황에 따라 서버를 변경해가며 접속할 수 있습니다. 아래 각 서버를 클릭하여 프로파일 설치파일을 다운받습니다.
다운 받은 프로파일 설치파일을 실행합니다.

2
"시스템 설정 -> 개인정보 보호 및 보안"에서 프로파일을 설치합니다. 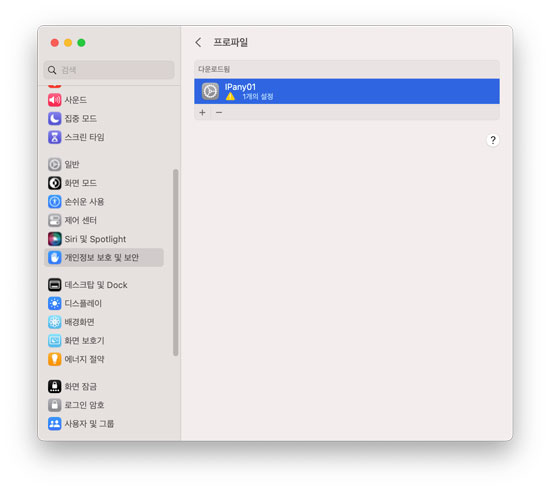
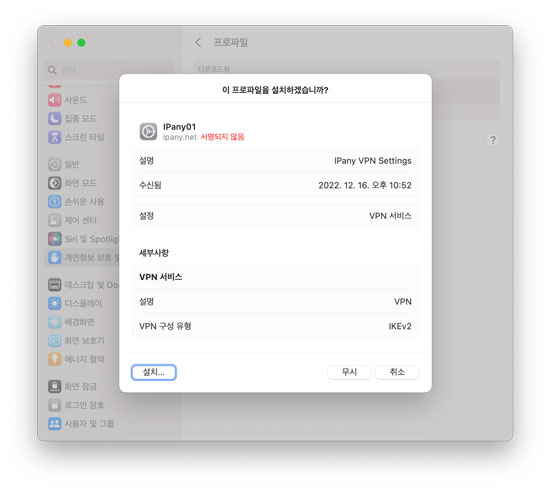
프로파일을 설치하면, VPN 설정이 생겨난 것을 확인할 수 있습니다. 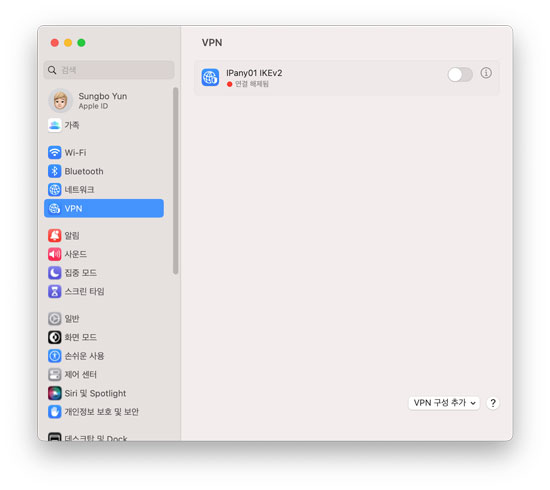
3
VPN 설정 옆의 정보 버튼(i)를 클릭한 후 "사용자 이름"과 "암호"에 VPN 접속 아이디와 비밀번호를 입력합니다. 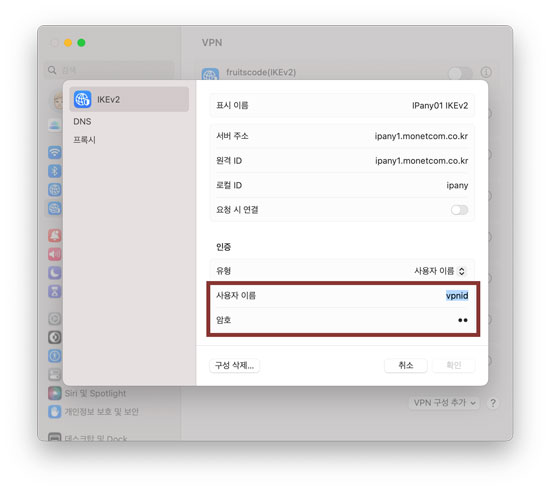
주의 여기에 사용되는 아이디와 비밀번호는 IPany 홈페이지 로그인에 사용되는 SNS 아이디 비밀번호가 아닙니다. IPany 홈페이지 로그인 후 자신이 직접 생성한 VPN 접속 아이디 비번입니다. VPN 접속 아이디와 비밀번호가 기억나지 않는다면 계정 관리에서 확인합니다.
4 옆의 버튼을 클릭하면 VPN에 접속됩니다. 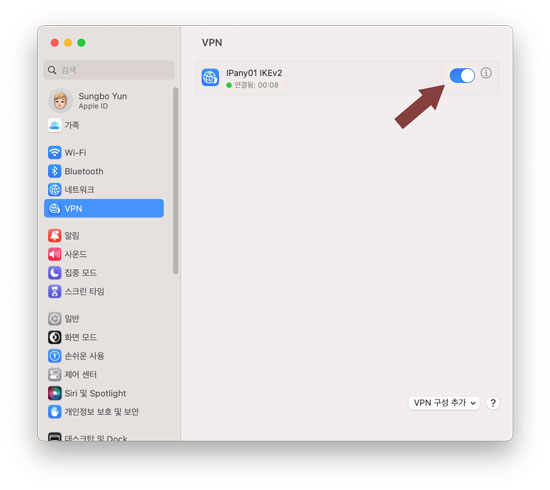
간편 접속 및 접속 끊기
그림과 같이 메뉴 막대의 VPN 상태 아이콘을 클릭하고 "IPanyXX 연결"을 선택하면 접속됩니다. 
VPN 상태 아이콘을 클릭했을 때 "IPany 연결"이 "IPanyXX 연결 해제"로 변경되어 있으면 접속에 성공한 것입니다. "IPanyXX 연결 해제"를 클릭하면 접속이 끊어지게됩니다. 
접속에 실패했다면 아래 "접속 실패 원인 확인"을 참고하세요.
MAC OS X에서 DNS 서버를 한국 DNS 서버로 변경하는 방법입니다.
이 방법으로도 해결이되지 않는다면 PI보드를 이용한 VPN 접속 방법을 사용해야 합니다.
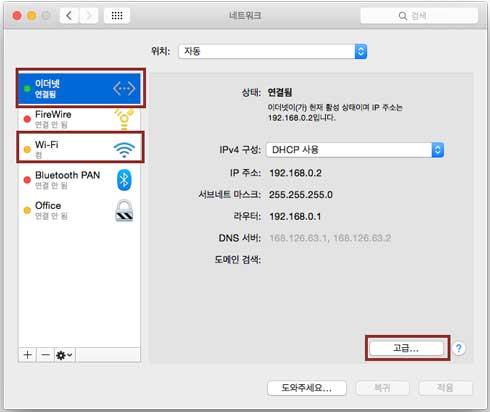
- 환경설정에서 네트워크를 열고 이더넷 또는 Wi-Fi를 선택합니다. "고급"을 클릭합니다.
- DNS 탭에서 "DNS 서버" 창 아래의 +(플러스)를 클릭하고 그림과 같이 한국 DNS 서버 주소를 입력합니다.
한국 DNS 서버:
168.126.63.1
168.126.63.2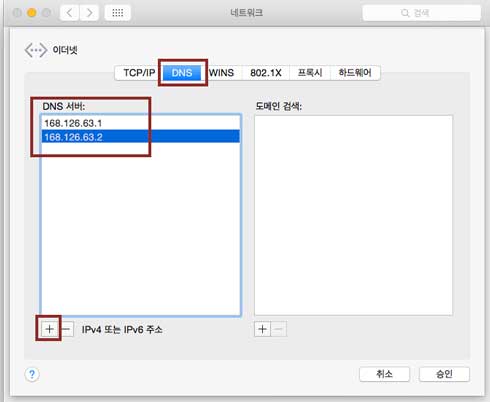
- "승인" 과 "적용" 버튼을 차례로 선택하여 변경 내용을 적용하고 재부팅 합니다.
설정 변경
VPN 설정에서 비밀번호를 변경하면 접속이되지 않습니다. 비밀번호나 아이디를 변경하려면 기존 프로파일을 지우고 다시 설치해야 합니다.
접속 설정 삭제
"시스템환경설정 -> 프로파일"에서 설치된 프로파일을 선택하고 삭제하면 VPN 접속 설정이 지워집니다. 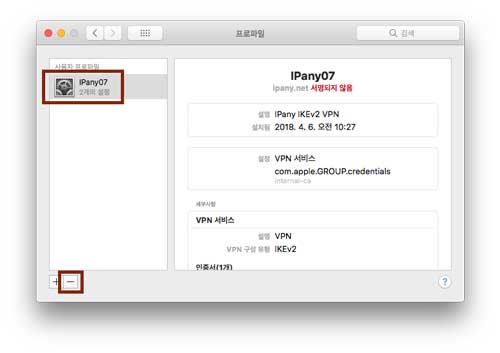
접속 서버 변경 방법
IPany는 다중 접속 서버를 제공합니다. 언제든 원한다면 자신이 사용 중인 인터넷과 잘 맞는 서버를 선택해 접속할 수 있습니다. 여러 개의 접속 서버 프로파일을 등록해 놓고 접속에 문제가 있을 때 다른 서버로 변경해 접속하세요. 상기 "접속 설정" 내용을 확인하세요.
접속 실패 원인 확인
해외에서 접속하는 사용자의 경우 접속 서버를 변경하여 접속 장애를 해결하거나 품질을 향상시킬 수 있습니다. 위 "접속 서버 변경" 내용을 확인하세요.
서버를 변경해도 접속이 되지 않는다면 아래 내용을 확인하세요.
| 접속 실패 원인 | 해결 방법 |
|---|---|
| Username 이나 Password를 잘못 입력한 경우 | 아이디와 비밀번호를 잘못 입력하지 않았는지 확인합니다. (IPany 홈페이지의 계정 관리에서 자신이 생성한 VPN 접속 계정의 아이디와 비밀번호를 확인할 수 있습니다.) |
| 만기일이 지난 경우 | IPany 홈페이지의 계정 관리에서 VPN 접속 계정의 사용 기일이 지나지 않았는지 확인합니다. 사용 기한이 지났다면 "연장" 버튼을 클릭하여 결제하고 연장합니다. |
| 이중으로 접속된 경우 | IPany 서비스는 같은 계정으로 동시에 이중 접속이 되지 않습니다. 이미 다른 기기에서 접속되어 있지 않은지 확인하고 접속되어 있는 기기에서 VPN 연결을 끊어줍니다. IPany 홈페이지의 계정 관리의 "현재 VPN 연결 현황 확인하기" 버튼을 클릭하면 VPN 서버에 연결되어 있는 현황를 확인할 수 있으며, 강제 접속 종료도 가능합니다. |
| DNS 서버 문제 | DNS 문제로 IPany VPN 서버를 찾지 못하면 VPN 연결이 가능하지 않습니다. 네트워크 설정에서 AirPort나 이더넷의 DNS 설정에서 DNS 서버 주소를 168.126.63.1로 변경해 주세요. |
PPTP VPN 접속 방법입니다. 예전에 사용하던 VPN 방식입니다. 방화벽이나 일부 오래된 공유기를 사용는 환경에서는 접속이 가능하지 않을 수 있습니다(619 오류 발생)
OS X Sierra 버전부터는 PPTP 방식 접속이 가능하지 않습니다. Sierra 이상 버전을 사용 중이라면 IKEv2 방법을 이용하세요.
접속 설정 만들기
MAC OS X에는 PPTP VPN 접속 기능이 이미 내장되어 있어 별도 프로그램 설치없이 사용자가 쉽게 설정해 접속이 가능합니다.
1 Apple 메뉴에서 "시스템 환경설정"을 클릭합니다.

2 "네트워크"를 선택합니다.

3 "네트워크" 좌측 창 아래에 "+"를 클릭합니다.
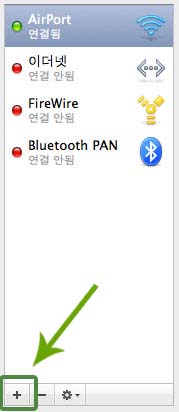
4 아래와 같이 입력 또는 선택하고 생성 버튼을 클릭합니다.
인터페이스: "VPN" 선택
VPN 유형: "PPTP" 선택
서비스 이름: "IPany" 입력
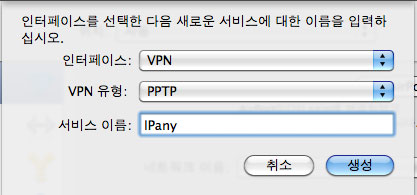
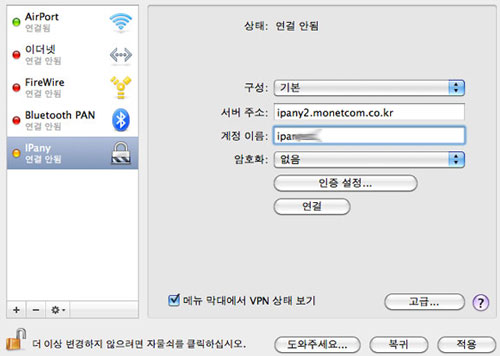
5 좌측 창에서 "IPany 구성되지 않음"을 선택하고 우측 창에 아래와 같이 입력 또는 선택합니다.
| 구성 | "기본" 선택 |
| 서버 주소 | 아래 서버 중 하나를 입력합니다. ipany1.monetcom.co.kr ipany2.monetcom.co.kr ipany3.monetcom.co.kr ipany12.monetcom.co.kr |
| 계정 이름 | IPany 홈페이지의 계정 관리에서 생성한 아이디를 입력합니다. |
| 암호화 | "없음" 또는 "자동"을 선택합니다. |
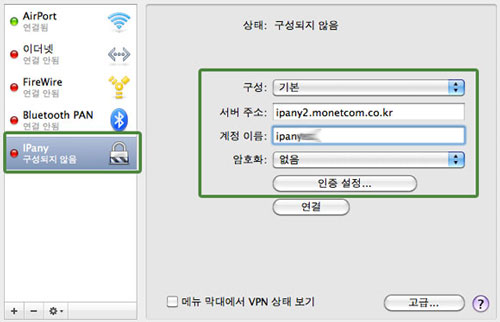
주의 여기에 사용되는 아이디와 비밀번호는 IPany 홈페이지 로그인에 사용되는 SNS 아이디 비밀번호가 아닙니다. IPany 홈페이지 로그인 후 자신이 직접 생성한 VPN 접속 아이디 비번입니다. VPN 접속 아이디와 비밀번호가 기억나지 않는다면 계정 관리에서 확인합니다.
6 "인증 설정"을 클릭하고 "암호"에 IPany 홈페이지의 계정 관리에서 생성한 아이디의 비밀번호를 입력하고 "승인"을 클릭합니다.
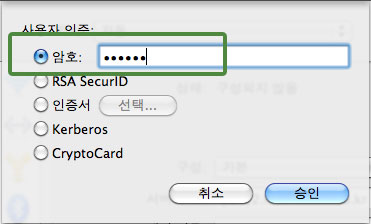
주의 여기에 사용되는 아이디와 비밀번호는 IPany 홈페이지 로그인에 사용되는 SNS 아이디 비밀번호가 아닙니다. IPany 홈페이지 로그인 후 자신이 직접 생성한 VPN 접속 아이디 비번입니다. VPN 접속 아이디와 비밀번호가 기억나지 않는다면 계정 관리에서 확인합니다.
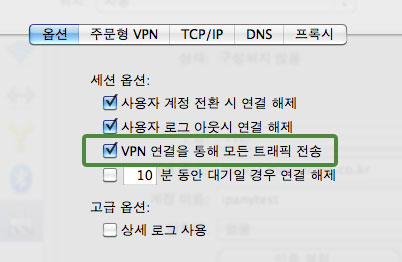
7 IPany 아이피 서비스를 이용하려면 모든 트래픽이 VPN 연결을 통하도록 해야 합니다. "고급"을 클릭하고 옵션에서 "VPN 연결을 통해 모든 트래픽 전송"을 선택하고 "승인"을 클릭합니다.
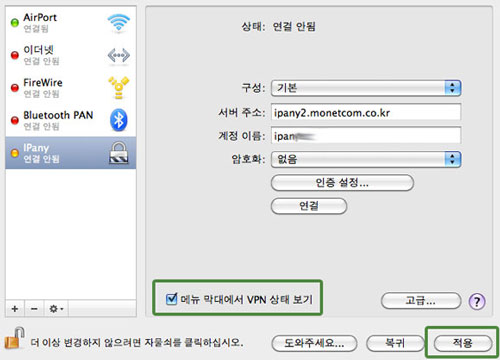
8 마지막으로 메뉴 막대에서 바로 VPN 접속이 가능하게 "메뉴 막대에서 VPN 상태 보기"를 선택하고 "적용"을 클릭합니다.
접속하기
그림과 같이 메뉴 막대의 VPN 상태 아이콘을 클릭하고 "IPany 연결"을 선택하면 접속됩니다.

접속에 실패했다면 아래 "접속 실패 원인 확인"을 참고하세요.
메뉴 막대의 VPN 상태 아이콘을 클릭하고 "네트워크 환경설정 열기"를 선택하여 아이디, 비밀번호, 서버주소를 변경할 수 있습니다. (비밀번호는 "인증 설정"에서 변경할 수 있습니다.)

MAC OS X에서 DNS 서버를 한국 DNS 서버로 변경하는 방법입니다.
이 방법으로도 해결이되지 않는다면 PI보드를 이용한 VPN 접속 방법을 사용해야 합니다.
- 환경설정에서 네트워크를 열고 이더넷 또는 Wi-Fi를 선택합니다. "고급"을 클릭합니다.

- DNS 탭에서 "DNS 서버" 창 아래의 +(플러스)를 클릭하고 그림과 같이 한국 DNS 서버 주소를 입력합니다.
한국 DNS 서버:
168.126.63.1
168.126.63.2
- "승인" 과 "적용" 버튼을 차례로 선택하여 변경 내용을 적용하고 재부팅 합니다.
접속끊기
막대의 VPN 상태 아이콘을 클릭하고 "IPany 연결 해제"를 선택하면 접속이 끊어집니다.

접속 서버 변경 방법
메뉴 막대의 VPN 상태 아이콘을 클릭하고 "네트워크 환경설정 열기"를 선택하여 서버주소를 변경할 수 있습니다.


PPTP 접속이 가능한 서버는 아래와 같습니다.
ipany1.monetcom.co.kr
ipany2.monetcom.co.kr
ipany3.monetcom.co.kr
ipany12.monetcom.co.kr
접속 실패 원인 확인
해외에서 접속하는 사용자의 경우 접속 서버를 변경하여 접속 장애를 해결하거나 품질을 향상시킬 수 있습니다. 위 "접속 서버 변경 방법" 내용을 확인하세요. 서버를 변경해도 접속이 되지 않는다면 아래 내용을 확인하세요.
VPN 연결에 실패하면 오류 메세지가 나타나게 됩니다.

오류 메세지에 따른 접속 실패 원인 및 해결 방법입니다.
| 오류 메세지 | 접속 실패 원인 및 해결 방법 |
|---|---|
| 인증에 실패했습니다. | Username 이나 Password를 잘못 입력하거나, 만기일이 지나거나, 이미 다른 기기나 컴퓨터에서 접속되어 있는 경우입니다. IPany 서비스는 같은 계정으로 동시에 이중 접속이 되지 않습니다. IPany 홈페이지의 계정 관리"에서 계정 상태를 확인하세요. |
| 서버에 접속할 수 없습니다. | 서버 주소를 잘못 입력했거나, DNS 문제로 IPany VPN 서버를 찾지 못하는 경우입니다. 네트워크 설정에서 IPany VPN 연결의 서버주소를 확인합니다. 네트워크 설정에서 AirPort나 이더넷의 DNS 설정에서 DNS 서버 주소를 168.126.63.1로 변경해 주세요. |
그래도 접속이 되지 않는다면 방화벽으로 막혀있거나 공유기 문제로 접속이 되지 않는 경우입니다. OpenVPN 접속 방법으로 접속해야 합니다.
OpenVPN 접속 방법입니다. IKEv2 접속이 가능하지 않다면 이방법을 이용하세요. 하지만, 중국에서는 OpenVPN 접속이 가능하지 않습니다. 대신 OpenVPN SSL(이중 암호화 방식)을 이용하세요.
접속 프로그램 설치
MAC OS X에서 OpenVPN 접속은 "Tunnelblick"이라는 프로그램을 사용하며, MAC OS X 10.4.11 버전 이상에서 사용이 가능합니다.
1 아래 버튼을 클릭하여 설치 파일을 다운받고 실행합니다.
Tunnelblick 설치파일 다운받기
Tunnelblick 아이콘을 더블 클릭하여 프로그램을 설치합니다. 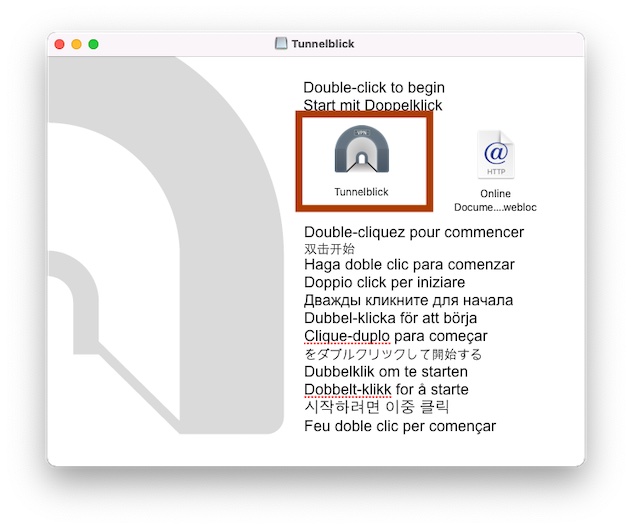
2 Tunnelblick이 실행됩니다. 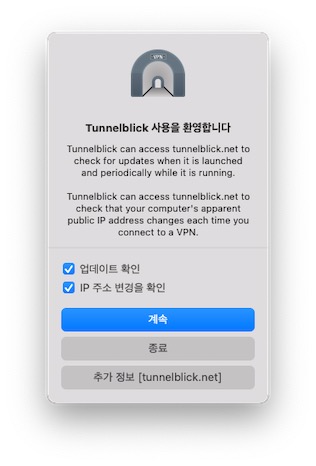
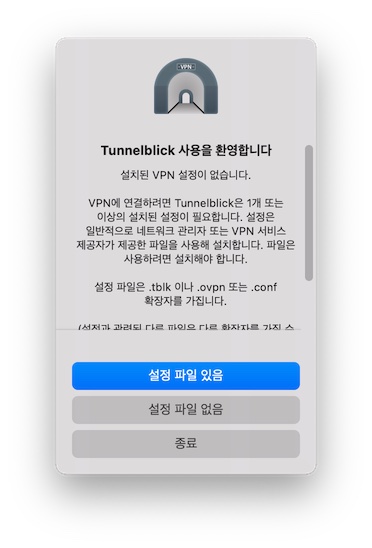
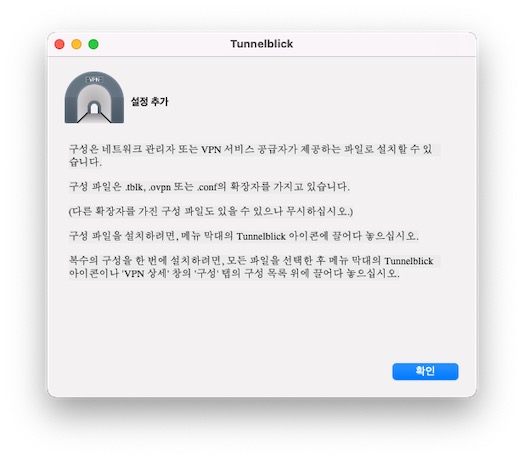
설정파일 있음을 선택하고, 확인을 선택해 창을 닫습니다.
3
아래 다운로드 버튼을 클릭하여 설정 파일을 다운받습니다.
설정 파일 다운받기
다운로드가 끝나면 "다운로드"에서 "ipany.ovpn"를 실행하고 이 설정을 사용할 사용자를 선택합니다. "모든 사용자" 또는 "나만"을 클릭하면 됩니다. 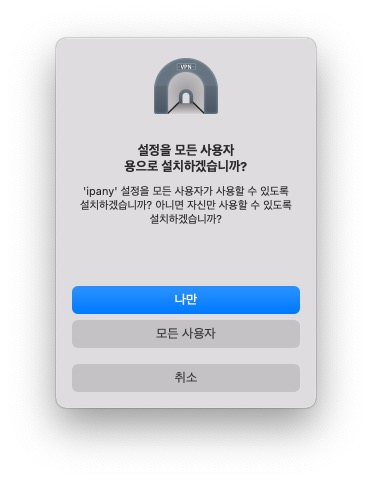
접속하기
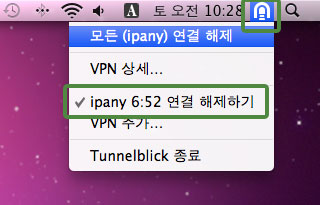
1 그림과 같이 메뉴 막대의 Tunnelblick 아이콘을 클릭하고 "ipany 연결하기"을 선택합니다. 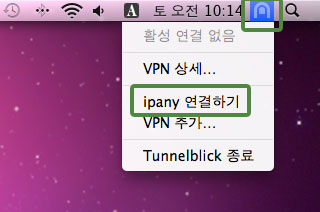
2
로그인 창이 열리면 IPany 홈페이지의 계정 관리에서 생성한 아이디와 비밀번호를 입력하고 "확인" 버튼을 클릭하면 접속됩니다. "키체인에 저장"를 선택하면 다음에 로그인 없이 바로 접속이 가능합니다. 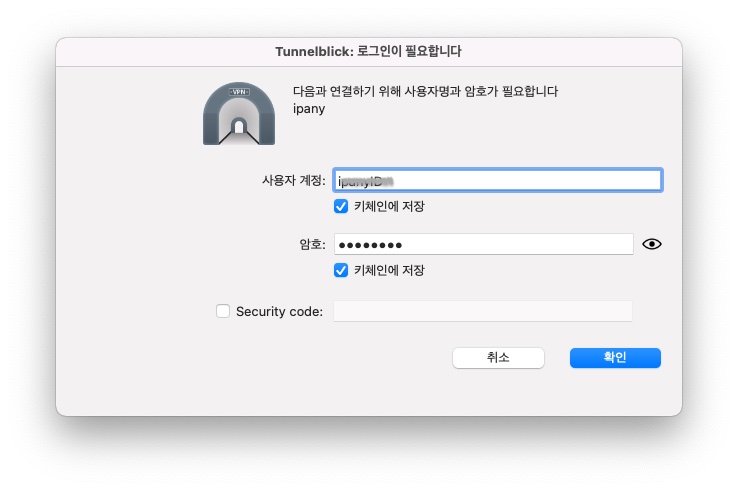
주의 여기에 사용되는 아이디와 비밀번호는 IPany 홈페이지 로그인에 사용되는 SNS 아이디 비밀번호가 아닙니다. IPany 홈페이지 로그인 후 자신이 직접 생성한 VPN 접속 아이디 비번입니다. VPN 접속 아이디와 비밀번호가 기억나지 않는다면 계정 관리에서 확인합니다.
접속에 실패했다면 아래 "접속 실패 원인 확인"을 참고하세요.
"키체인에 저장"을 선택한 후 아이디나 비밀번호를 수정해야 한다면, Command + Space (Spotlight 검색)에서 "키체인 접근"을 입력해 키체인 접근 창을 열어줍니다. Tunnelblick.Auth.ipany 두 개를 찾아 지워주면 VPN 접속 시 다시 아이디와 비밀번호를 입력할 수 있습니다. 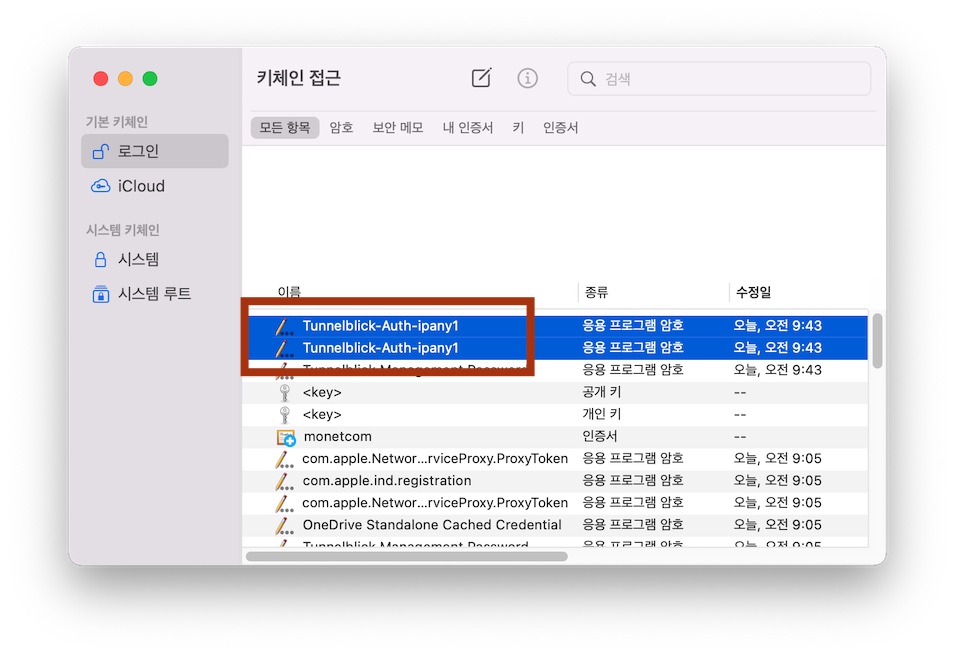
MAC OS X에서 DNS 서버를 한국 DNS 서버로 변경하는 방법입니다.
이 방법으로도 해결이되지 않는다면 PI보드를 이용한 VPN 접속 방법을 사용해야 합니다.
- 환경설정에서 네트워크를 열고 이더넷 또는 Wi-Fi를 선택합니다. "고급"을 클릭합니다.

- DNS 탭에서 "DNS 서버" 창 아래의 +(플러스)를 클릭하고 그림과 같이 한국 DNS 서버 주소를 입력합니다.
한국 DNS 서버:
168.126.63.1
168.126.63.2
- "승인" 과 "적용" 버튼을 차례로 선택하여 변경 내용을 적용하고 재부팅 합니다.
접속끊기
메뉴 막대의 Tunnelblick 아이콘에 마우스를 올리면 나타나는 상태 창에서 "연결 해제"를 선택하거나, Tunnelblick 아이콘을 클릭하고 "ipany 연결 해제"를 선택하면 접속이 끊어집니다. 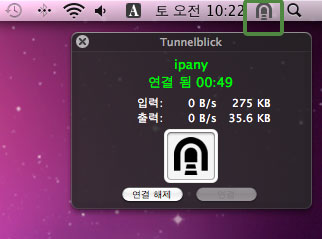
삭제하기
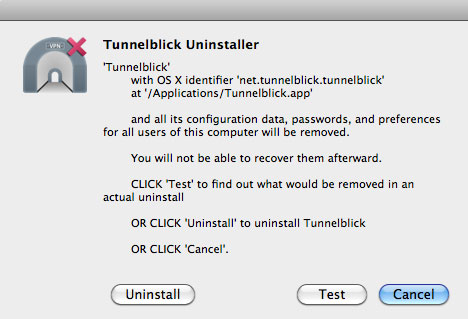
OpenVPN을 더이상 사용하지 않아 Tunnelblick을 제거하기 원한다면, 아래 다운받기를 클릭하여 Tunnelblick_Uninstaller 파일을 다운받고 실행하면 제거할 수 있습니다. Tunnelblick이 실행 중이라면 Uninstall하기 전에 먼저 종료해야 합니다.
Tunnelblick 삭제 파일 다운받기
접속 실패 원인 확인
VPN 연결 로그를 확인하여 접속 실패 원인을 확인할 수 있습니다. 로그를 확인하려면 메뉴 막대의 Tunnelblick 아이콘을 클릭하고 "VPN 상세"를 선택합니다.
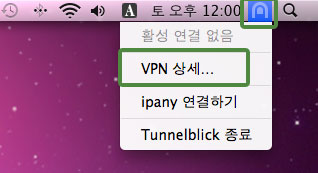
"로그" 탭을 선택하면 접속 로그를 확인할 수 있습니다. 아래 표를 참고하여 로그 내용을 확인합니다.
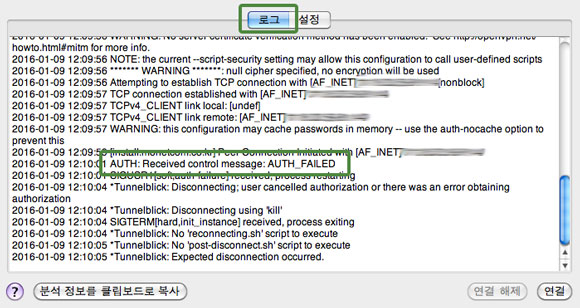
접속 로그 내용에 따른 접속 실패 원인과 해결 방법입니다.
| 접속 로그 내용 | 접속 실패 원인 및 해결 방법 |
|---|---|
| AUTH: Received control message: AUTH_FAILED | Username 이나 Password를 잘못 입력하거나, 만기일이 지나거나, 이미 다른 기기나 컴퓨터에서 접속되어 있는 경우입니다. IPany 서비스는 같은 계정으로 동시에 이중 접속이 되지 않습니다. IPany 홈페이지의 계정 관리에서 계정 상태를 확인하세요. |
| RESOLVE: Cannot resolve host address: ipany... | DNS 문제로 IPany VPN 서버를 찾지 못하는 경우입니다. 컴퓨터의 DNS 설정에서 DNS 서버 주소를 168.126.63.1로 변경해 주세요. |
| All TAP-Win32 adapters on this system are currently in use | 가상 드라이브가 이미 실행되고 있는 경우입니다. 컴퓨터를 재부팅하고 접속합니다. |
| "Unable to connect because your certificate is not yet valid. Check that your system time is correct" 라는 메세지가 뜨는 경우 | 사용자 컴퓨터의 현재 시간이 잘못되어 있는 경우입니다. 컴퓨터의 시간을 현재시간으로 조정한 후 접속합니다. |
| TLS Error: TLS key negotiation failed to occur within 60 seconds (check your network connectivity) | 사용자의 인터넷 연결 상태가 불안하거나, 외국에서 접속하는 경우 현지 인터넷과 IPany 회선간 경로가 좋지 않은 경우입니다. 공유기를 사용한다면 공유기를 10분 정도 껐다가 켜고 다시 시도해 봅니다. 또 다른 이유는 컴퓨터의 시간이 잘못되어 있는 경우입니다. 컴퓨터의 시간 설정을 확인하세요. |
| TLS Error: Unroutable control packet received | 사용자의 컴퓨터의 시간이 잘못되어 있는 경우입니다. 컴퓨터의 시간 설정을 확인하세요. |
| UDP/TCP: connect to ipany... failed | IPany VPN 서버로 접속할 수 없는 경우입니다. 인터넷이 연결되어 있지 않거나, 외국에서 접속하는 경우 현지 인터넷과 IPany 회선간 경로가 좋지 않은 경우입니다. 공유기를 사용한다면 공유기를 10분 정도 껐다가 켜고 다시 시도해 봅니다. |
OpenVPN 이중 암호화 접속 방법입니다. 중국에서 Openvpn 접속이 가능하지 않기 때문에 이 방법을 이용합니다. Stunnel이라는 암호화 터널을 미리 구성하여 그 터널을 통해 OpenVPN 접속이 가능하게 하는 방식입니다.
접속 프로그램 설치
OpenVPN 이중 암호화 방식을 사용하려면 Stunnel 과 OpenVPN 접속 프로그램(Tunnelblick)을 설치하고 각각의 설정 파일 들을 다운받아 저장해 주어야 합니다.
MAC OS X에서 OpenVPN 접속은 "Tunnelblick"이라는 프로그램을 사용하며, MAC OS X 10.4.11 버전 이상에서 사용이 가능합니다.
1 아래 버튼을 클릭하여 설치 파일을 다운받고 실행합니다.
Tunnelblick 설치파일 다운받기
Tunnelblick 아이콘을 더블 클릭하여 프로그램을 설치합니다. 
2 Tunnelblick이 실행됩니다. 
설정파일 있음을 선택하고, 확인을 선택해 창을 닫습니다.


3
아래 다운로드 버튼을 클릭하여 설정 파일을 다운받습니다.
설정 파일 다운받기
다운로드가 끝나면 "다운로드"에서 "ipanyS.ovpn"를 실행하고 이 설정을 사용할 사용자를 선택합니다. "모든 사용자" 또는 "나만"을 클릭하면 됩니다. 
4 이제는 이중 암호화 터널을 구성해주는 "Stunnel" 프로그램을 설치해야 합니다. Stunnel을 설치하기 위해서는 MAC 용 패키지 관리자인 "Homebrew"를 먼저 설치해야 합니다.
5 "Homebrew"와 "Stunnel"은 "터미널"에서 설치할 수 있습니다.
Command + Space (Spotlight 검색)에서 "터미널"을 입력해 터미널을 열어줍니다. 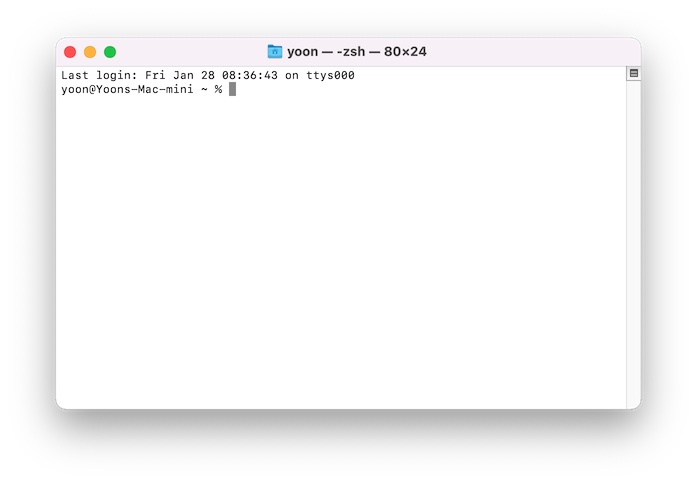
6 터미널이 열리면 아래 내용을 복사 붙여넣기하여 실행합니다.
/usr/bin/ruby -e "$(curl -fsSL https://raw.githubusercontent.com/Homebrew/install/master/install)"
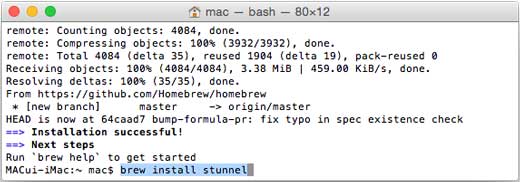
7 Homebrew 설치에 성공했다면, 다시 터미널에서 아래 내용을 복사 붙여넣기하여 "Stunnel"을 설치합니다.
/opt/homebrew/bin/brew install stunnel
8
Stunnel 설치에 성공했다면, 터미널을 닫지 않고 그대로 두고 아래 다운로드 버튼을 클릭하여 Stunnel 설정파일과 인증파일을 다운로드 폴더로 다운받습니다.
설정 인증 파일 다운받기
9 다시 터미널에서 아래 내용을 차례로 복사 붙여넣기 실행하여 다운 받은 Stunnel의 설정파일과 인증파일을 Stunnel이 설치된 폴더로 복사합니다.
echo 'eval "$(/opt/homebrew/bin/brew shellenv)"' >> ~/.zprofile; eval "$(/opt/homebrew/bin/brew shellenv)"
unzip ~/Downloads/stunnelmac.zip -d /opt/homebrew/etc/stunnel
10 터미널에 아래와 같이 입력하고 "Stunnel"을 실행합니다.
sudo stunnel

접속하기
1 Stunnel을 이용해 OpenVPN을 연결하려면 항상 터미널에서 Stunnel을 먼저 실행해야 합니다.
터미널에 아래와 같이 입력하고 "Stunnel"을 실행합니다.
sudo stunnel

2 그림과 같이 메뉴 막대의 Tunnelblick 아이콘을 클릭하고 "ipanyS 연결하기"을 선택합니다. 
3
로그인 창이 열리면 IPany 홈페이지의 계정 관리에서 생성한 아이디와 비밀번호를 입력하고 "확인" 버튼을 클릭하면 접속됩니다. "키체인에 저장"를 선택하면 다음에 로그인 없이 바로 접속이 가능합니다. 
주의 여기에 사용되는 아이디와 비밀번호는 IPany 홈페이지 로그인에 사용되는 SNS 아이디 비밀번호가 아닙니다. IPany 홈페이지 로그인 후 자신이 직접 생성한 VPN 접속 아이디 비번입니다. VPN 접속 아이디와 비밀번호가 기억나지 않는다면 계정 관리에서 확인합니다.
접속에 실패했다면 아래 "접속 실패 원인 확인"을 참고하세요.
"키체인에 저장"을 선택한 후 아이디나 비밀번호를 수정해야 한다면, Command + Space (Spotlight 검색)에서 "키체인 접근"을 입력해 키체인 접근 창을 열어줍니다. Tunnelblick.Auth.ipany 두 개를 찾아 지워주면 VPN 접속 시 다시 아이디와 비밀번호를 입력할 수 있습니다. 
MAC OS X에서 DNS 서버를 한국 DNS 서버로 변경하는 방법입니다.
이 방법으로도 해결이되지 않는다면 PI보드를 이용한 VPN 접속 방법을 사용해야 합니다.
- 환경설정에서 네트워크를 열고 이더넷 또는 Wi-Fi를 선택합니다. "고급"을 클릭합니다.

- DNS 탭에서 "DNS 서버" 창 아래의 +(플러스)를 클릭하고 그림과 같이 한국 DNS 서버 주소를 입력합니다.
한국 DNS 서버:
168.126.63.1
168.126.63.2
- "승인" 과 "적용" 버튼을 차례로 선택하여 변경 내용을 적용하고 재부팅 합니다.
접속끊기
메뉴 막대의 Tunnelblick 아이콘에 마우스를 올리면 나타나는 상태 창에서 "연결 해제"를 선택하거나, Tunnelblick 아이콘을 클릭하고 "ipany 연결 해제"를 선택하면 접속이 끊어집니다. 

삭제하기
OpenVPN을 더이상 사용하지 않아 Tunnelblick을 제거하기 원한다면, 아래 다운받기를 클릭하여 Tunnelblick_Uninstaller 파일을 다운받고 실행하면 제거할 수 있습니다. Tunnelblick이 실행 중이라면 Uninstall하기 전에 먼저 종료해야 합니다.
Tunnelblick 삭제 파일 다운받기

접속 실패 원인 확인
VPN 연결 로그를 확인하여 접속 실패 원인을 확인할 수 있습니다. 로그를 확인하려면 메뉴 막대의 Tunnelblick 아이콘을 클릭하고 "VPN 상세"를 선택합니다.

"로그" 탭을 선택하면 접속 로그를 확인할 수 있습니다. 아래 표를 참고하여 로그 내용을 확인합니다.

접속 로그 내용에 따른 접속 실패 원인과 해결 방법입니다.
| 접속 로그 내용 | 접속 실패 원인 및 해결 방법 |
|---|---|
| AUTH: Received control message: AUTH_FAILED | Username 이나 Password를 잘못 입력하거나, 만기일이 지나거나, 이미 다른 기기나 컴퓨터에서 접속되어 있는 경우입니다. IPany 서비스는 같은 계정으로 동시에 이중 접속이 되지 않습니다. IPany 홈페이지의 계정 관리에서 계정 상태를 확인하세요. |
| RESOLVE: Cannot resolve host address: ipany... | DNS 문제로 IPany VPN 서버를 찾지 못하는 경우입니다. 컴퓨터의 DNS 설정에서 DNS 서버 주소를 168.126.63.1로 변경해 주세요. |
| All TAP-Win32 adapters on this system are currently in use | 가상 드라이브가 이미 실행되고 있는 경우입니다. 컴퓨터를 재부팅하고 접속합니다. |
| "Unable to connect because your certificate is not yet valid. Check that your system time is correct" 라는 메세지가 뜨는 경우 | 사용자 컴퓨터의 현재 시간이 잘못되어 있는 경우입니다. 컴퓨터의 시간을 현재시간으로 조정한 후 접속합니다. |
| TLS Error: TLS key negotiation failed to occur within 60 seconds (check your network connectivity) | 사용자의 인터넷 연결 상태가 불안하거나, 외국에서 접속하는 경우 현지 인터넷과 IPany 회선간 경로가 좋지 않은 경우입니다. 공유기를 사용한다면 공유기를 10분 정도 껐다가 켜고 다시 시도해 봅니다. 또 다른 이유는 컴퓨터의 시간이 잘못되어 있는 경우입니다. 컴퓨터의 시간 설정을 확인하세요. |
| TLS Error: Unroutable control packet received | 사용자의 컴퓨터의 시간이 잘못되어 있는 경우입니다. 컴퓨터의 시간 설정을 확인하세요. |
| UDP/TCP: connect to ipany... failed | IPany VPN 서버로 접속할 수 없는 경우입니다. 인터넷이 연결되어 있지 않거나, 외국에서 접속하는 경우 현지 인터넷과 IPany 회선간 경로가 좋지 않은 경우입니다. 공유기를 사용한다면 공유기를 10분 정도 껐다가 켜고 다시 시도해 봅니다. |